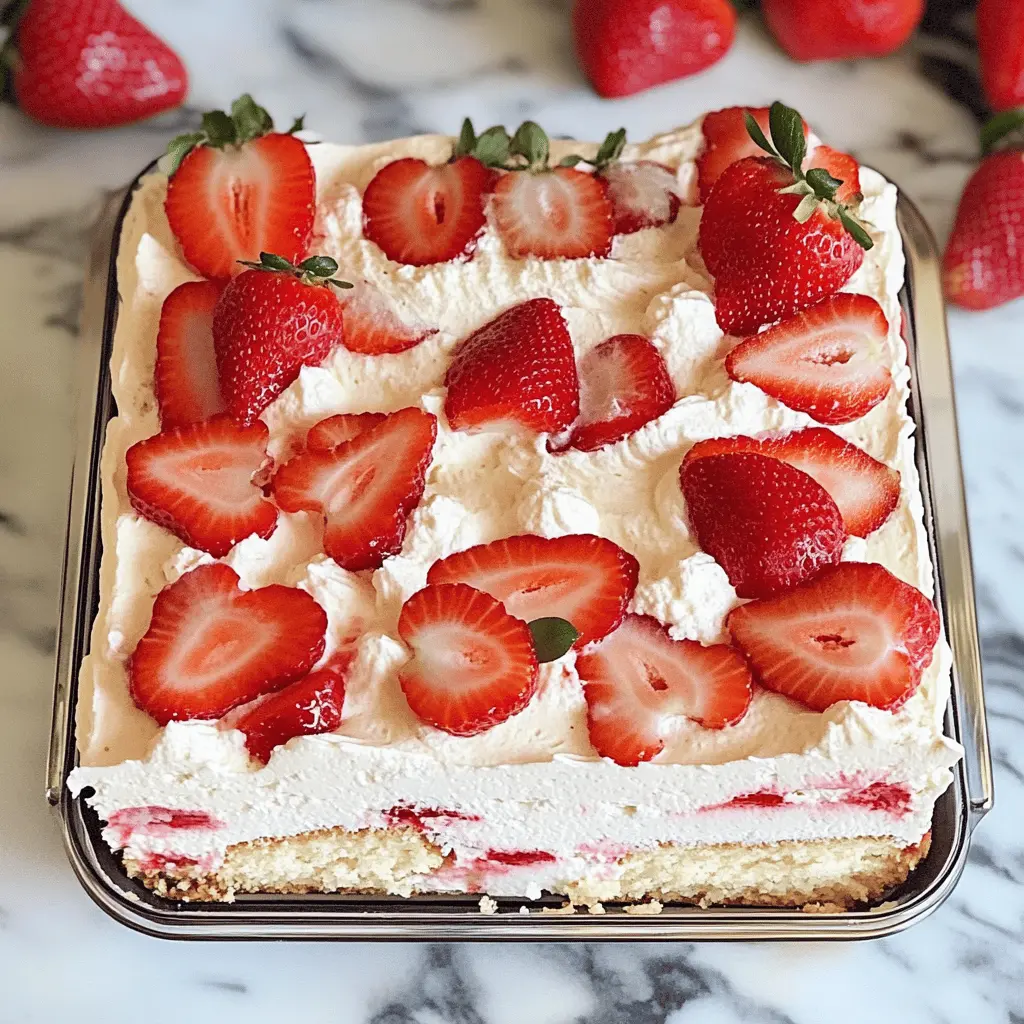
This Strawberry Icebox Cake is a cool and creamy delight that’s super easy to make—all without turning on the oven! Layers of fluffy whipped cream and fresh strawberries make it a summer favorite.
Honestly, who can resist the combination of sweet strawberries and light cream? Every bite feels like a sweet hug! I love making it ahead of time so it’s ready when guests arrive. 🍓
Key Ingredients & Substitutions
Heavy Whipping Cream: This is the star of the cake, providing that light and fluffy texture. If you’re looking for a lighter option, you can use whipped topping instead, but it won’t be as creamy. I love using fresh cream for its rich flavor.
Powdered Sugar: This sugar dissolves easily and sweetens the whipped cream perfectly. If you’re watching your sugar intake, you can substitute with a sugar alternative like powdered erythritol or stevia, but be cautious about sweetness levels.
Strawberries: Fresh strawberries add a burst of flavor and color. If you can’t find fresh berries, thawed frozen strawberries work as long as you drain the excess liquid. I enjoy using a mix of berries for added taste!
Graham Crackers/Ladyfingers: Both are great for creating layers in the cake. If you’re gluten-sensitive, look for gluten-free graham crackers or use cookies like wafer cookies. I usually prefer ladyfingers for their softness.
Strawberry Jam: This brings an extra layer of sweetness and strawberry flavor. If you want a fresh twist, try using raspberry or peach jam instead. It’s a fun way to change the flavor profile!
How Do I Get The Whipped Cream Just Right?
Whipping cream can be tricky, but there’s a simple way to make it perfect. Start with chilled tools; a cold mixing bowl and beaters help achieve the best volume. Here’s how:
- Begin whipping the cream on medium speed until it shows faint bubbles.
- Slowly add powdered sugar and vanilla while mixing to avoid clumps.
- Switch to high speed and whip until stiff peaks form. This means the cream stands tall on its own.
- Be careful not to over-whip, or you’ll end up with butter!
How to Make a Delicious No-Bake Strawberry Icebox Cake
Ingredients You’ll Need:
For the Cream Layer:
- 2 cups heavy whipping cream
- 1 cup powdered sugar
- 1 teaspoon vanilla extract
For the Strawberry Layer:
- 2 cups strawberries, hulled and sliced (plus extra for garnish)
- 1 cup strawberry jam or preserves
For Assembly:
- 1 package (14.1 oz) graham crackers or ladyfingers
- Optional: fresh mint leaves for garnish
How Much Time Will You Need?
This delightful no-bake dessert takes about 20 minutes to prepare and requires at least 4 hours of chilling time in the fridge (overnight is even better). It’s a simple and refreshing treat that’s perfect for any occasion!
Step-by-Step Instructions:
1. Preparing the Whipped Cream:
In a large mixing bowl, use an electric mixer on medium speed to whip the heavy cream. Keep whipping until it begins to thicken. Slowly add the powdered sugar and vanilla extract while continuing to mix. Keep going until stiff peaks form. Once it looks fluffy and holds its shape, set the whipped cream aside for later.
2. Mixing the Strawberries:
In another separate bowl, take your sliced strawberries and mix them with the strawberry jam or preserves. Stir gently, making sure all the strawberry slices are well coated with the jam. This will add a lovely flavor to your cake.
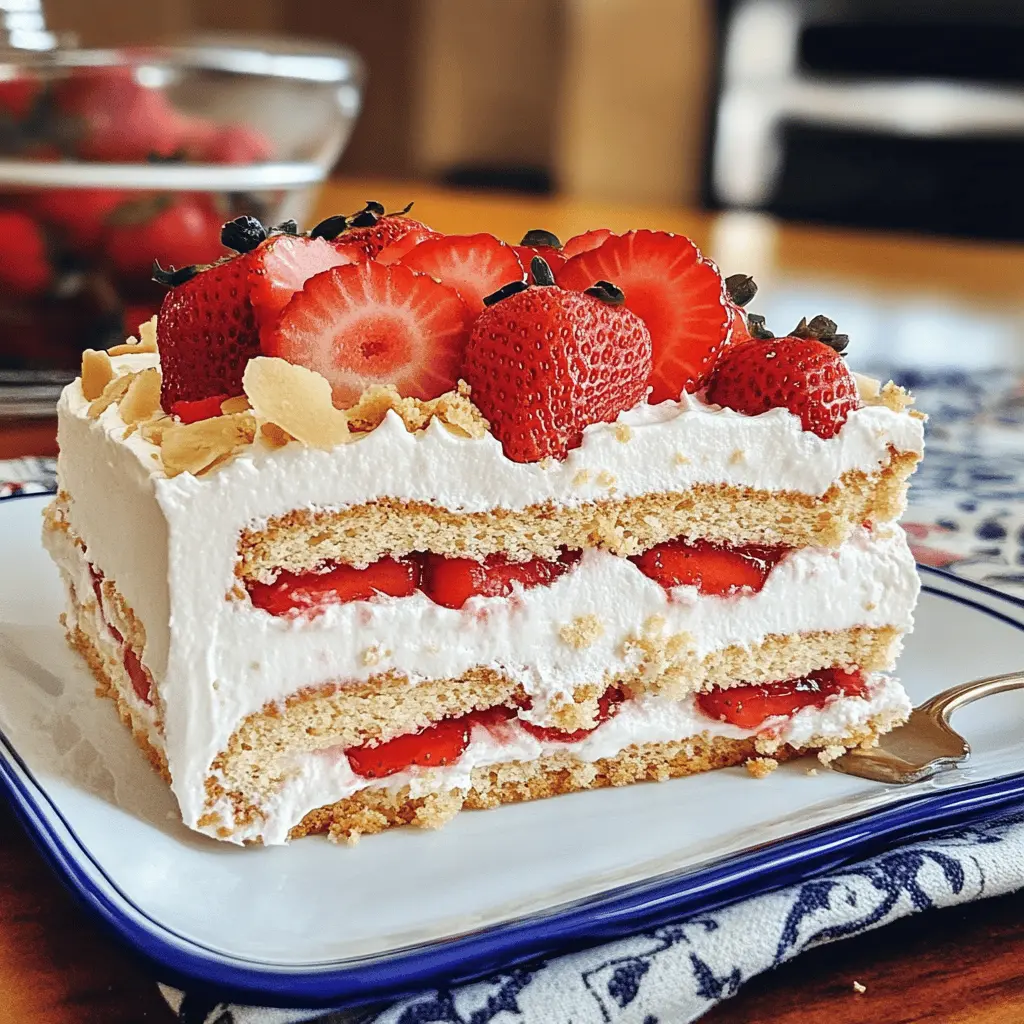
3. Assembling the Cake:
Start by spreading a thin layer of the whipped cream on the bottom of a 9×13 inch baking dish. This will be the base of your cake. Next, lay down a layer of graham crackers or ladyfingers over the whipped cream. Feel free to break them into smaller pieces if they don’t fit perfectly!
4. Creating Layers:
Next, grab half of your strawberry mixture and spread it over the layer of crackers. Then, add another layer of whipped cream on top. Repeat this process: add another layer of graham crackers, the rest of the strawberries, and finally top it all off with the remaining whipped cream.
5. Final Touches and Chilling:
Once you’ve added the last layer of whipped cream, smooth it out nicely on top. Now it’s time for some garnishes! Add extra strawberry slices and fresh mint leaves for a pretty finishing touch. Then, cover the dish with plastic wrap and pop it in the fridge for at least 4 hours, or overnight if you can wait!
6. Serving:
When you’re ready to enjoy your strawberry icebox cake, simply slice it into squares and serve it chilled. Enjoy every bite of this refreshing and delightful dessert!
Can I Use Greek Yogurt Instead of Heavy Whipping Cream?
While Greek yogurt adds a nice tang, it won’t yield the same creamy texture as heavy whipping cream. If you’re looking for a lighter option, you can use a mix of 1 cup Greek yogurt and 1 cup whipped topping for a similar effect! Just be sure to adjust the sweetness, as yogurt can be tart.
How to Store Leftovers?
Store any leftover Strawberry Icebox Cake in an airtight container in the refrigerator for up to 3 days. To maintain freshness, try to eat it within the first couple of days as the crackers will soften over time!
Can I Use Frozen Strawberries?
Yes, you can! Thaw the frozen strawberries, then drain excess liquid before slicing and mixing with the strawberry jam. This will prevent the cake from becoming too watery, ensuring every layer maintains its delicious structure.
How Can I Make It Vegan?
To make a vegan version, substitute the heavy cream with coconut cream or a vegan whipped topping. Use maple syrup instead of powdered sugar and ensure your jam is vegan-friendly. You can also opt for graham crackers that are free of dairy products. Enjoy your plant-based treat!